
X-CTU is free software, provided by Digi (the manufacturer of XBee), which we use to configure and manage XBees, and test XBee networks.
If you haven’t already, head over to their website and download the latest release and follow their instructions to install the software.
Adding XBee’s
Before continuing on, make sure you’ve plugged an XBee (correctly) into your Explorer, and have the Explorer plugged into your computer. When you installed the drivers for your Explorer it should have been assigned port number. You’ll need that shortly.
After initially opening X-CTU, you’ll be presented with a window like this:

To add your XBee(s), click the “Add device” icon in the upper-left part of the window. That will prompt this screen to show up:
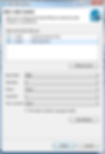
Select your communication port. If you’re lucky (or just don’t have a lot of stuff connected to your computer) you may only have one option here. Otherwise Windows users should look for the entry that says “USB Serial Port” and Mac users should look for something like “usbserial-XXXXXXXX”. (If you’re using a USB board, that is. If you’re using a Serial Explorer, pick the “Communications Port” option.)
This window also allows you to specify more specific serial characteristics like baud rate, data bits, and stop bits. Assuming this is the first time you’ve used your XBee, you can leave those settings alone. So make sure those values look just as they do in the image above and click Finish.
A “Discovering radio modules…” window will briefly scroll by, after which you should be presented with the original window, but with an addition to the “Radio Modules” section on the left. (If X-CTU failed to find a module, check out our troubleshooting page.)
Click that new module, and wait a few seconds as X-CTU reads the configuration settings of your XBee. You should then be presented with the entire configuration of your XBee.

As you can see by scrolling down the right half, there are a lot of configuration settings available. We’ll get to some of those later. For now, though, verify that the configurable settings visible in the screenshot above match those of your XBee (channel=C, PAN ID=3332, DH=0, DL=0, MY=0).
Do It Again
To test communication between your XBee’s you’ll need to connect your second XBee to a computer as well. That means doing the “Add device” dance one more time.
If you have another computer available, you can install X-CTU on that as well and perform the same set up. You can certainly perform this test with both XBees connected to the same computer as well, just make sure you select the correct port number when you’re adding the second XBee.
If you add a second XBee to the same computer, a second entry will be added to the “Radio Modules” list. Selecting either of those entries will show the configuration settings for that, specific XBee.

Note that there are two XBees in the list on the left. The configuration values shown are for the highlighted XBee.
If you’re ever unsure which XBee is which, try to match up the MAC numbers. These numbers are printed on a sticker on the bottom side of your XBee, and they’re also listed in XCTU. (It’s listed as the “Serial Number” high and low, and is un-modifiable.)

Each XBee has a unique MAC address, printed on a sticker in the highlighted area.
As with the last module, make sure all settings are defaulted (channel=C, PAN ID=3332, DH=0, DL=0, MY=0). That’ll make the next step possible.
Quick and Easy Test
Click the “Switch to Consoles” icon – – in the upper-right part of the window. This will switch from the configuration tab to the console. We can use the console to send characters to an XBee, which will route that character over-the-air to any other XBee it’s connected to.
If you have two XBees connected to your computer, you can switch between each radio’s console by selecting the device on the left.
First, open a serial connection on each device by clicking the connect icon – . The icon will change, and the border of the console will turn green.

Next, click into the left half of the console, and type a letter or number. You should notice that character echoed in a blue font (the hexadecimal digits on the right represent the ASCII value). Now click into the other XBee’s console. As long as it was open, you should see that same character, but red. Try typing a different character into the second XBee’s console, and you should see it work the other way.
If that worked, then your XBees are configured to talk to each other! If not, check out the troubleshooting page.
That your XBees can talk to each other out of the box is no real surprise. They’re all configured to, by default, be on the same network with the same addresses. That might be OK, but what if your neighbor is running an XBee-based robot control network, while you’re trying to automate your house? Every time they try to roll a bot forward, your garage door might open! To be safe, you should configure your XBees to operate on a unique network. Fortunately, that, and most other XBee settings are easy to change. On to the next page!
Configuring Networks
As we’ve mentioned, XBees are awesome because they’re highly – and easily – configurable. Most of the XBee configuration settings come down to controlling which other XBees it can talk to. On this page, we’ll show you how to configure three of the most important XBee settings there are: PAN ID, MY address, and destination address.
There are a few levels to XBee networks. First, there’s the channel. This controls the frequency band that your XBee communicates over. Most XBee’s operate on the 2.4GHz 802.15.4 band, and the channel further calibrates the operating frequency within that band. You can usually leave the channel setting alone, or at least make sure every XBee you want to have on the same network operates on the same channel.
The next level of an XBee network is the personal area network ID (PAN ID). The network ID is some hexadecimal value between 0 and 0xFFFF. XBees can only communicate with each other if they have the same network ID. There being 65536 possible ID’s, there’s a very small chance that your neighbor will be operating on the same network (as long as you change it from the default!).
Finally there are MY and destination addresses. Each XBee in a network should be assigned a 16-bit address (again between 0 and 0xFFFF), which is referred to as MY address, or the “source” address. Another setting, the destination address, determines which source address an XBee can send data to. For one XBee to be able to send data to another, it must have the same destination address as the other XBee’s source.
For example, if XBee 1 has a MY address of 0x1234, and XBee 2 has an equivalent destination address of 0x1234, then XBee 2 can send data to XBee 1. But if XBee 2 has a MY address of 0x5201, and XBee 1 has a destination address of 0x5200, then XBee 1 cannot send data to XBee 2. In this case, only one-way communication is enabled between the two XBee’s (only XBee 2 can send data to XBee 1).

We can use X-CTU to easily configure each of those settings. Here’s how:
Radio Configuration
After the last page, you should already have at least one XBee connected to X-CTU. If you’re still over in the console tab, click back over to the Configuration tab – . Take a peak at the very first handful of settings, and you should see some familiar acronyms: CH, ID, DH, DL, and MY. Beside each of those blocks is a text box – that’s where we’ll type in our new settings.
Network ID (ID)
Begin by coming up with a unique network ID number. Think of your favorite number between 0 and 65535, consult your friends and neighbors to make sure your favorite isn’t their favorite, then convert it to hexadecimal. Or if you don’t want to put that much effort into it, use a random value like 4394.
Type your 16-bit network ID into the white text box next to PAN ID.
MY Address (MY)
Your next job is to create addresses for each XBee in your network. These values should be unique to each XBee in a network. The MY address can be any value between 0x0000 and 0xFFFF. Type this address into the text box next to “MY 16-bit Source Address”.
If you only have two XBees, you can assign the first an MY address of 0, and the other an address of 1.
(Your XBee’s can share the same MY address, they’ll both receive the same data if it’s broadcasted to that address.)
Destination Address (DH & DL)
The destination address defines which XBee your source XBee is talking to. There are actually two values used to set the destination: destination high (DH) and destination low (DL). You can use that pair of values in one of two ways to set your XBee’s mate:
Leave DH set to 0, and set DL to the MY address of the receiving XBee.
Set DH to the Serial Number High (SH) and DL to the Serial Number Low (SL) of your destination XBee.
Either method works, but the former – setting DH to 0 and DL to the destination’s MY address – is usually easier.
Here’s an example for setting up the ID, DH, DL, and MY values for a pair of XBees:
SettingAcronymXBee 1XBee 2
ChannelCHCC
PAN IDID43944394
Destination Address HighDH00
Destination Address LowDL10
16-bit Source AddressMY01
Notice how the only real differences are the DL and MY values, which are flip-flopped on each XBee.
Write Changes
Once you’ve made your changes to the text field, click the brown pencil icon () to write your changes. The property background should turn from green to blue, indicating it has been written to a non-default value.

XBee 1’s config tab after writing the changes.
Now, just like last time, you can try to send data from one XBee to the other via the console. As long as the addresses and PAN ID’s match up, you should have the same success as last time.
While it may seem like a lot of work to get right back to where you were, using a unique PAN ID and addressing scheme will make your data transfer more secure and reliable.
Troubleshooting
If your XBee’s are giving you any trouble, here are some common problems and fixes we recommend:
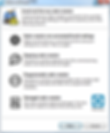
Can’t Find Device – If XCTU can’t find your XBee, we recommend recovery or discovery.
XBees Not Communicating Wirelessly – If a pair of XBees are failing to communicate, we recommend resetting everything to default.
Resetting XBees – A trick to resetting your XBee (if you don’t have a reset button).
Can’t Find Device
Are you having a hard time “finding” an XBee? If you’re “Add Device” process is being followed by a window like this:
There are two options we recommend: discovery or recovery.
Discovery
The Discover radio devices tool is an extension of “Add devices”. Open the discovery window by clicking the XBee/magnifying glass icon – – in the top-left.
Once again you’ll be prompted to select which communication port your XBee is connected to. Double check that you’ve selected the correct one (or even try multiple). The next window will present you with every, single serial setting available, and a whole lot of checkboxes:

Most of the cases where your XBee is hiding it’s because the baud rate has been altered. A quick fix for this is to select all possible baud rates in the discovery window, then click Finish. The discovery process works a lot like the add process except it tests out every selection you make in this window – that means it will take a little longer to finish.
Hopefully you’ve found an XBee that was just configured to talk at a weird baud rate. If not you can select any of the other checkboxes as well, but it’ll make for a longer and longer discovery process. Click every checkbox and you might be waiting upwards of an hour for your XBee to be discovered (permutations!).
If you’re not having any luck with discovery, the next step is recovery.
Recovery
If your XBee seems bricked, don’t worry! You can most likely recover it. To get to the recovery screen, click the Tools icon, and select XBee Recovery.

Once again, you’ll need to select your COM port, and you’ll also need to select the product family. This can be found on the bottom sticker of your XBee. If you’re using a series 1 module, the family should be XB24. Beyond that you’ll need to select a “Function Set” and “Firmware Version”. For both of those you should be safe selecting the top-most values in the list.

Once you’ve made all of those selections, click Recover.
The recovery process may take a few minutes. You’ll be prompted to reset your XBee. If your Explorer has a reset button, simply press it when prompted, otherwise see the “Reset” section below.
During recovery, if XCTU can find your XBee it will. It’ll also update the firmware, and set you back to the default settings. If you know what got your XBee bricked in the first place…maybe don’t do that again.
XBee’s Not Communicating, Reset to Defaults
If no matter what changes you make to the config settings your XBee’s just won’t communicate with each other, try resetting them both to the default values.
In the config tab, click the “Load default firmware settings” icon – (not sure how to describe that icon). Then click Yes to confirm that you want to reset everything.
If you’re presented with any red-backgrounded error notifications (like below), first try to refresh the value, by clicking the green icon – .

If that doesn’t fix the error, you can probably get away with typing a “0” in that box (usually this pops up for properties like encryption keys or other values meant to be kept secret).
After you’ve loaded the default values, you still need to write the settings by clicking the big pencil icon above – .
After defaulting both radios, the addresses, networks, and other settings should all be compatible. Try communicating over the console again.